Cut Laminate with Oscillating Tool: Expert Techniques and Tips
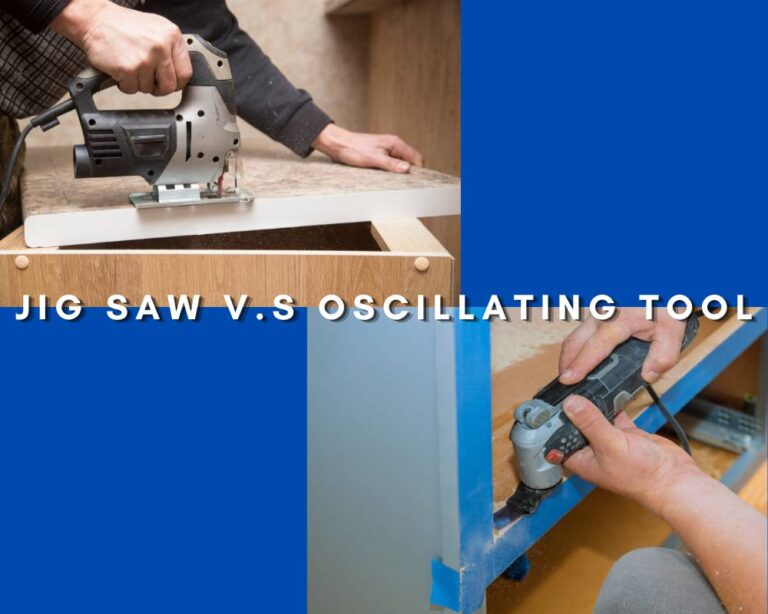
Cutting laminate flooring can be daunting for many DIY enthusiasts, but it becomes significantly more manageable with the right tools. One of the most efficient tools for this job is an oscillating tool, commonly known as a multi-tool. An oscillating tool to cut laminate flooring provides precise cuts with minimal effort and clean edges.
Laminate flooring requires careful handling to avoid chipping or uneven edges, and the oscillating tool’s versatility makes it ideal for detailed work. In addition to cutting laminate, the multi-tool can tackle various tasks, making it a valuable addition to any DIYer’s toolkit. Proper usage ensures a seamless fit and a professional finish for any flooring project.
When cutting laminate with an oscillating tool, it’s vital to use the appropriate blade designed for wooden materials. This reduces the risk of damaging the laminate and ensures a smooth cut.
Understanding Laminate Flooring
Laminate flooring offers a durable and cost-effective alternative to hardwood and vinyl. Its construction and various types provide different benefits and suit multiple applications.
Composition and Durability
Laminate flooring consists of multiple layers. The base is usually a high-density fiberboard (HDF). On top is a photographic layer that mimics the appearance of wood or stone. A protective wear layer covers this.
The result is a product that resists scratches, dents, and fading. It’s suitable for high-traffic areas and is more moisture-resistant than traditional wood flooring.
Types of Laminate Flooring
Laminate flooring comes in different styles, such as textured, smooth, and embossed. It can imitate the look of hardwood, tile, or even stone. Some versions offer water-resistant features, ideal for kitchens and bathrooms.
Thickness can vary, usually 6 to 12 mm, affecting durability and comfort. Locking mechanisms, such as click-lock or tongue-and-groove, simplify installation without needing adhesives.
Preparation for Cutting Laminate
Proper preparation ensures clean and accurate cuts when working with laminate flooring. This involves gathering the necessary tools and precisely measuring and marking the laminate before cutting.
Essential Tools and Materials
When cutting laminate with an oscillating tool, having the right tools and materials is crucial.
Essential tools needed include:
- Oscillating tool: For cutting the laminate.
- Straight edge: For guiding cuts.
- Tape measure: To ensure accurate measurements.
- Pencil: For marking laminate.
- Utility knife: For initial scoring.
- Masking tape: To prevent chipping.
- Safety glasses: For eye protection.
Using high-quality tools will lead to better results. Ensure all tools are in good condition before starting the project.
Measuring and Marking Techniques
Accurate measuring and marking are crucial to achieving precise cuts.
- Measure the area: Use a tape measure to determine the dimensions of the space.
- Mark the laminate: Mark the cutting lines on the laminate with a pencil.
- Straight edge: Align the straight edge with the pencil marks to guide cuts.
- Score the laminate: Use a utility knife to score along the cutting line. This helps in cleaner cuts.
- Masking tape: Apply masking tape along the cut line to reduce the risk of chipping.
These steps ensure the laminate is cut to the correct size and shape, providing a professional finish.
Cutting Techniques and Tips
Effective cutting techniques with an oscillating tool make working with laminate straightforward and precise. Knowing how to handle different types of cuts helps ensure clean edges and minimizes mistakes.
Straight Cuts and Rip Cutting
Using an oscillating tool for straight cuts requires steady hands and a controlled approach. Clamp down the laminate to keep it secure. If necessary, start with pilot holes. Use a flush-cutting blade for the best results.
Guides or straight edges can achieve straight cuts. Attach the guide securely to your work surface. A jigsaw or circular saw may offer more efficiency for rip cutting, but the oscillating tool provides more control.
Making Precise Plunge and Flush Cuts
For plunge cuts, begin by clearly marking the cut line. Press the blade into the material, allowing the oscillating tool to work. Move slowly to maintain control and accuracy.
A flush-cutting blade or a segment saw blade is recommended when making flush cuts. These blades help minimize chipping and achieve a clean finish. Always use a steady hand and maintain a consistent speed.
Minimizing Mistakes and Chipping
To reduce mistakes and chipping, use painter’s tape along the cut line to keep the laminate intact. Ensure blades are sharp and suitable for laminate to avoid jagged edges.
Practice on scrap pieces before the final cut to perfect the technique. Always double-check measurements and markings to prevent errors. The best results are achieved using a combination of slow, controlled movements and the right blades.
Post-Cutting Procedures
After cutting laminate with an oscillating tool, some important steps must be taken to ensure a clean and safe finish and proper disposal of waste materials. Attention to these tasks can make a difference in the quality and safety of the DIY project.
Cleaning and Disposing of Debris
Once cutting is complete, remove all debris from the work area. Use a shop vacuum to clean up laminate fragments and dust efficiently.
Collect larger pieces of debris manually, using a dustpan and brush if necessary. Dispose of the waste materials according to local regulations.
Consider using masking tape to gather fine particles to prevent residue from sticking to surfaces.
Safety Measures and Equipment
Safety after cutting is just as crucial as during the process. Wear gloves when handling debris to protect against sharp edges and splinters.
A dust mask is essential to prevent inhalation of fine particles left in the air. Keep masks and gloves on until the area is spotless.
Always unplug the oscillating tool and store it safely to avoid accidents.
Installation and Finishing Touches
Accurate installation and final detailing ensure that the cut laminate pieces integrate seamlessly with other flooring and room elements for a professional look.
Installing Cut Laminate Pieces
When placing the cut laminate pieces, ensure they fit snugly against walls, doors, and other obstructions. Use spacers to maintain a consistent expansion gap around the perimeter. This gap allows for natural expansion and contraction of the laminate floor with temperature changes.
Underlay is essential to provide a cushioning effect and sound barrier. Lay it out smoothly, ensuring no wrinkles or gaps. Align the cut laminate pieces meticulously, using a pull bar to lock them. Place the laminate edges tightly for a seamless look. Implement trimming as required around irregular shapes or tight corners. Doorjambs may need to be undercut to allow the laminate to slide beneath for a clean finish.
Achieving a Professional Finish
Attaining a professional finish involves focusing on details and precision. Use molding and trim to cover expansion gaps and provide a polished edge. It is recommended that quarter-round molding adds a refined look along baseboards. Carefully measure and cut trim pieces to avoid visible gaps or overlaps.
Pay attention to doorways and transitions between rooms. Unique transition strips help ensure smooth changes between different flooring types. Ensure doorjambs and frames are flush with the new floor level, which might require additional undercutting.
Regular cleaning during installation helps spot issues early. Sweep and wipe down the laminate frequently to prevent debris from affecting the placement and fit. This ensures an affordable yet high-quality flooring installation that is durable and visually appealing.